Showing posts with label Makeup Tip Mondays. Show all posts

Monday, July 11, 2011

Makeup Tip Monday: Curling Lashes

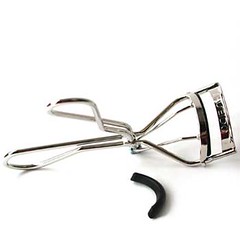
If you have been following my blog for awhile you probably know that the one beauty product I can't leave home without is mascara. And before I apply mascara I am religious about curling my lashes. I HIGHLY recommend using a lash curler because the curl factor can significantly impact the size and glam factor of the eyes. So here's my tip for curling the lashes:

For everyday use, curl the upper lashes BEFORE applying mascara. If you curl afterwards, there is a high chance that the curler will pluck out a few lashes, and if you do this everyday, you will be lash-less. However, if you apply mascara and curl only once in blue moon, you won't lose too many lashes. Therefore, when getting ready for a special occasion, feel free to curl your lashes after applying mascara (or  apply mascara, curl, and apply another coat of mascara for extreme lash impact). 

In other news, this is going to be my last Makeup Tip Monday. When I started this feature I had a bunch of tips I wanted to share, but now I feel like it is forced and I don't feel right doing blog posts because I have to. I started blogging because I wanted to share my knowledge and experiences and most of all I wanted it to be fun. The Makeup Tip Mondays feel more obligatory than fun. Therefore, from here on out, I will definitely be sharing my makeup tips and tricks, but it will be whenever I learn something new or feel like sharing something I haven't blogged about before. I hope you all will appreciate that and continue supporting this blog! =)

Monday, July 4, 2011

Makeup Tip Monday: Foundation Shopping

I know I missed my tip for last Monday, so please forgive me, but I hope you enjoy today's tip! I find it to be super helpful when I go foundation shopping:

When trying on a new foundation at a cosmetic store/counter, bring a pocket sized mirror with you or borrow one from the counter for a few minutes. After getting color-matched and applying the foundation to your face, take the mirror and step outside the store in to natural sunlight. Looking at the foundation in natural light will give you the best indicator of whether or not the foundation is a true match. A lot of times, stores are dark or have harsh yellow lighting that alters the appearance of foundation and you end up purchasing the wrong shade. 


I once heard that women buy 7 foundations before finding one that works for them. Hopefully, this tip will help narrow that number for some of you. 

Also, Happy 4th of July for those of you in the States. How will you be celebrating?

Monday, June 20, 2011

Makeup Tip Monday: Filling in Scars on Your Eyebrows

Ever get a cut or scrape on an eyebrow and don't know how to naturally cover up the scar? If so, here's how to tackle that issue the next time it happens:

Use a brow brush and tinted wax or matte cream product and gently cover the scar using short, light strokes in the direction of hair growth. The skin on a scar is smooth and has fewer pores than normal skin and pencils and powder products don't adhere well to scarred skin. Also, be sure to blend the brow product throughout the brows so it looks even and natural


Monday, June 13, 2011

Makeup Tip Monday: DIY Tinted Moisturizer

Ever look at your foundation wardrobe and feel like you have too many products? Here's an easy trick to save on buying a tinted moisturizer:

Invest in a good medium-full coverage foundation, and when you feel like you want lighter coverage, simply mix a bit of the foundation with your favorite moisturizer. 


Of course, this is only worthwhile if you use different coverages everyday. If you use tinted moisturizer everyday, it's probably a good idea to purchase one that you like. 

Monday, June 6, 2011

Makeup Tip Monday: Defining Lower Lashes

Here's a trick I do to help lower lashes stand out without dealing with mascara or adding length and volume:

Apply gel liner on the lower lashes using a brush. This will darken the lower lashes and helps them stand out, especially when wearing shadow on the lower lid.


Monday, May 23, 2011

Makeup Tip Monday: Baby Powder at the Beach

Sometimes we get caught up in the excitement of new beauty breakthroughs and we underestimate the power of basic beauty products. Now that summer is here and many of us will be spending some time at the beach, I want to share with two reasons why you should consider tossing some good ol' baby powder in to your beach bag.


1. Sprinkle some baby powder on your skin and rub lightly to help get the sand of your skin. I especially like this one because no matter how well I rinse off, I always end up with sand between my toes.

2. Sprinkle some baby powder on the roots of your hair to help absorb any grease and add some volume back in to your hair. Baby powder works as a cheap and easy "dry shampoo" and this trick is especially helpful if you are planning to go straight from the beach to dinner.

Do you use baby powder? If so, what for? 

Monday, May 16, 2011

Makeup Tip Monday: How to Depot Shadows and Blushes

Ladies, this is a big one. Despite the other depotting tutorials already out there in cyberland, in the past some readers have requested to know my method, so why not tell all of you!?!

(Warning, this post is photo-heavy.)

So here is a basic MAC eyeshadow in the normal pot:


I open the lid and shove thin tweezers between the little crack that holds the black plastic holding the pan of the shadow and the base of the pot. This will allow the black plastic pan to pop out:


Here is what it should look like with the black plastic pan holding the shadow popped out:


I then light a candle. Holding the black plastic with tweezers, I put the shadow over the flame to start melting a tiny hole in the black plastic. Be careful with this since you don't want to burn everything and end up ruining the shadow or burning yourself. I also recommend doing this by an open window because the plastic burning smell can be quite yucky.


Here you can see that the center of the black plastic has started to melt. The plastic has not melted all the way through, but it is quite soft.


I immediately take a semi-sharp object like a ball-point pen and press it on the melted spot to help push the metal eyeshadow pan out of the plastic. I try not to melt too much of the plastic, so if the shadow pan doesn't pop out right away, I try melting more plastic until I can pop the shadow pan out. Also, I usually lay a soft towel down while doing this so that when shadow pan comes out, it will hit a soft surface and not break.


The metal pan holding the shadow should start to come out of the plastic. At this point I lift the metal pan out of the plastic with my fingers. 


Here is the shadow pan popped out of the plastic. The shadow is face down. Note the sticky glue on the bottom of the metal pan.


While the glue is still sticky, I like to remove the shadow label paper from the bottom of the shadow container so I can attach it to a magnet and attach the magnet to the sticky glue on the metal pan. In order to loosen the paper label, I hold the shadow container a couple inches above the candle flame for a few seconds. The heat will loosen the glue that holds the label on to the plastic container.


Once the label is a little warm, it should peel right off.


I then stick the label on a magnet.


I usually trim the magnet label in to a square that is smaller than the metal shadow pan. I have found that when I use a magnet the whole size of the metal pan the magnet is large and has so much magnetic power that it becomes hard to remove from a pallete.


Here is the final shadow pan. Pretty close to the shadow pans you can just buy from MAC, right?


Finally, I pop the little plastic piece that held the metal shadow pan back into the shadow container. Why? So I can Back-to-MAC it of course!


There it is! Hopefully you find this helpful!

Monday, May 9, 2011

Makeup Tip Monday: Thick, Luscious Lashes

Wonder how some gals have the most luscious lashes without using falsies? Try this trick:

First apply one coat of mascara to the top side of the lashes....just fling the wand over the ends. Then apply mascara as normal to the underside. Applying mascara on the top helps thicken the lashes and also adds an extra coat to hold curl and add a bit of thickness. 

Monday, May 2, 2011

Makeup Tip Monday: Dealing With Watery Eyes

Do your eyes ever start to water when lining your waterline or applying mascara? Here's a quick and easy way to clean up those tears before they start to run down your face and ruin the rest of your makeup:

Use a Q-tip (ear bud) and press the tip gently on your tear duct. The cotton on the Q-tip will absorb the tears and you won't get any makeup streaks on your face, unlike Lauren Conrad from The Hills. 


Are you ladies enjoying these Makeup Tip Mondays? Should I keep doing them?

Monday, April 25, 2011

Makeup Tip Monday: Making Your Fragrance Last

We all know that fragrance is supposed to be spritzed and applied to our pulse points, but did you know that scents tend to rise? Therefore, when we apply fragrance to our neck and behind our ears, the scent won't last very long. So what do you do?

1. Apply the fragrance to multiple pulse points, including behind the knees and on your wrists. The lower the fragrance is on your body, the longer it will take to elevate and wear off.

2. Layer on the fragrance. Use the same scented body lotion, deodorant, etc. so that there are multiple layers to the scent and it lasts longer than perfume alone.


On that note, what is your favorite summer fragrance?

Monday, April 18, 2011

Makeup Tip Monday: A Natural Way to Bronze

Here's a tip for those that are new to bronzing/contouring or want a more natural way to bronze or sculpt the face:

Instead of using a bronzer, most of which tend to have shimmer, use your favorite powder formula in a couple shades darker than your natural skin tone. A powder will have a more natural finish to it and it will blend easily over or under your normal powder. You can also use a powder a few shades lighter than your skin tone to highlight your face. 


Do you like to bronze or contour? What product do you use?

Monday, April 11, 2011

Makeup Tip Monday: Getting the Most From Samples

Ever receive product samples in little packages, and the package contains enough product for more than 1 application, but because the package stays open you don't want to use it more than once? Here's what I do:

Open the sample packet and decant all the product into a sample or travel jar. That way, you can use up all the product in the package and it won't dry out or get funky. 


How was your weekend? I did a lot but I still got lots of time to relax. It's finally getting a little warmer here and today it is supposed to be in the high 70s....gasp!!! I am DEFINITELY going out this evening. 

Monday, April 4, 2011

Makeup Tip Monday: Adding Life Back To Your Hair

Do you fall in love with a particular shampoo/conditioner and then keep using that over and over and over? Well, this isn't always good for your hair. It's like working out....if you stick to the same exercise routine for a long time, your body gets used to the exercise and will plateau and you will stop seeing results. The same is true for your hair and hair products. So what do you do?

Switch up your shampoo and conditioner every few weeks to keep your hair looking fresh, voluminous, and to allow the ingredients in the products to actually work. Here's a couple ways to do so:
  1. Keep two sets of shampoo and conditioner that you like, and alternate using them every month. 
  2. If you prefer only using the shampoo and conditioner you usually use, every 3-4 weeks or so wash your hair once with a different shampoo and conditioner, then go back to using your normal products. This is a great way to use up that mediocre shampoo/conditioner you have sitting in your bathroom, or try out that sample thats been sitting around.

Ok, ok, so this wasn't really a makeup tip, but it is a beauty tip for your hair, so I think it counts! Do you switch up your hair products? What are your fave products?

Monday, March 28, 2011

Makeup Tip Monday! Practice Makes Perfect!

Hey gals and guys! So continuing my Makeup Tip Monday feature, here's another tip to help achieve makeup perfection:


Trying to perfect the winged liner look? Wondering how to wear that trendy bright blush? Well, practice the look in the evening right before you wash your face at night. If it turns out great, you're on your way to mastering the technique! If not, you are going to wash your face anyways so no one will see it!


Hope you got some rest over the weekend and your Monday is off to a great start!

LinkWithin

Related Posts with Thumbnails