Showing posts with label organization. Show all posts

Wednesday, April 18, 2012

How to Repurpose a Candle Jar for Makeup Storage

Due to my love of Bath and Body Works Slatkin & Co. Candles I have ended up with a lot of used candle jars, which I have repurposed and used for cosmetic storage. Here are a couple candles I used up during the winter holiday season and the process I use for removing the wax. 


1. Put the glass jar with the wax in the freezer for at least 1.5 hours. When you are ready to begin the wax removal process remove the jar from the freezer.


2. Take a butter knife and gently insert it into the wax. The wax will start cracking. 


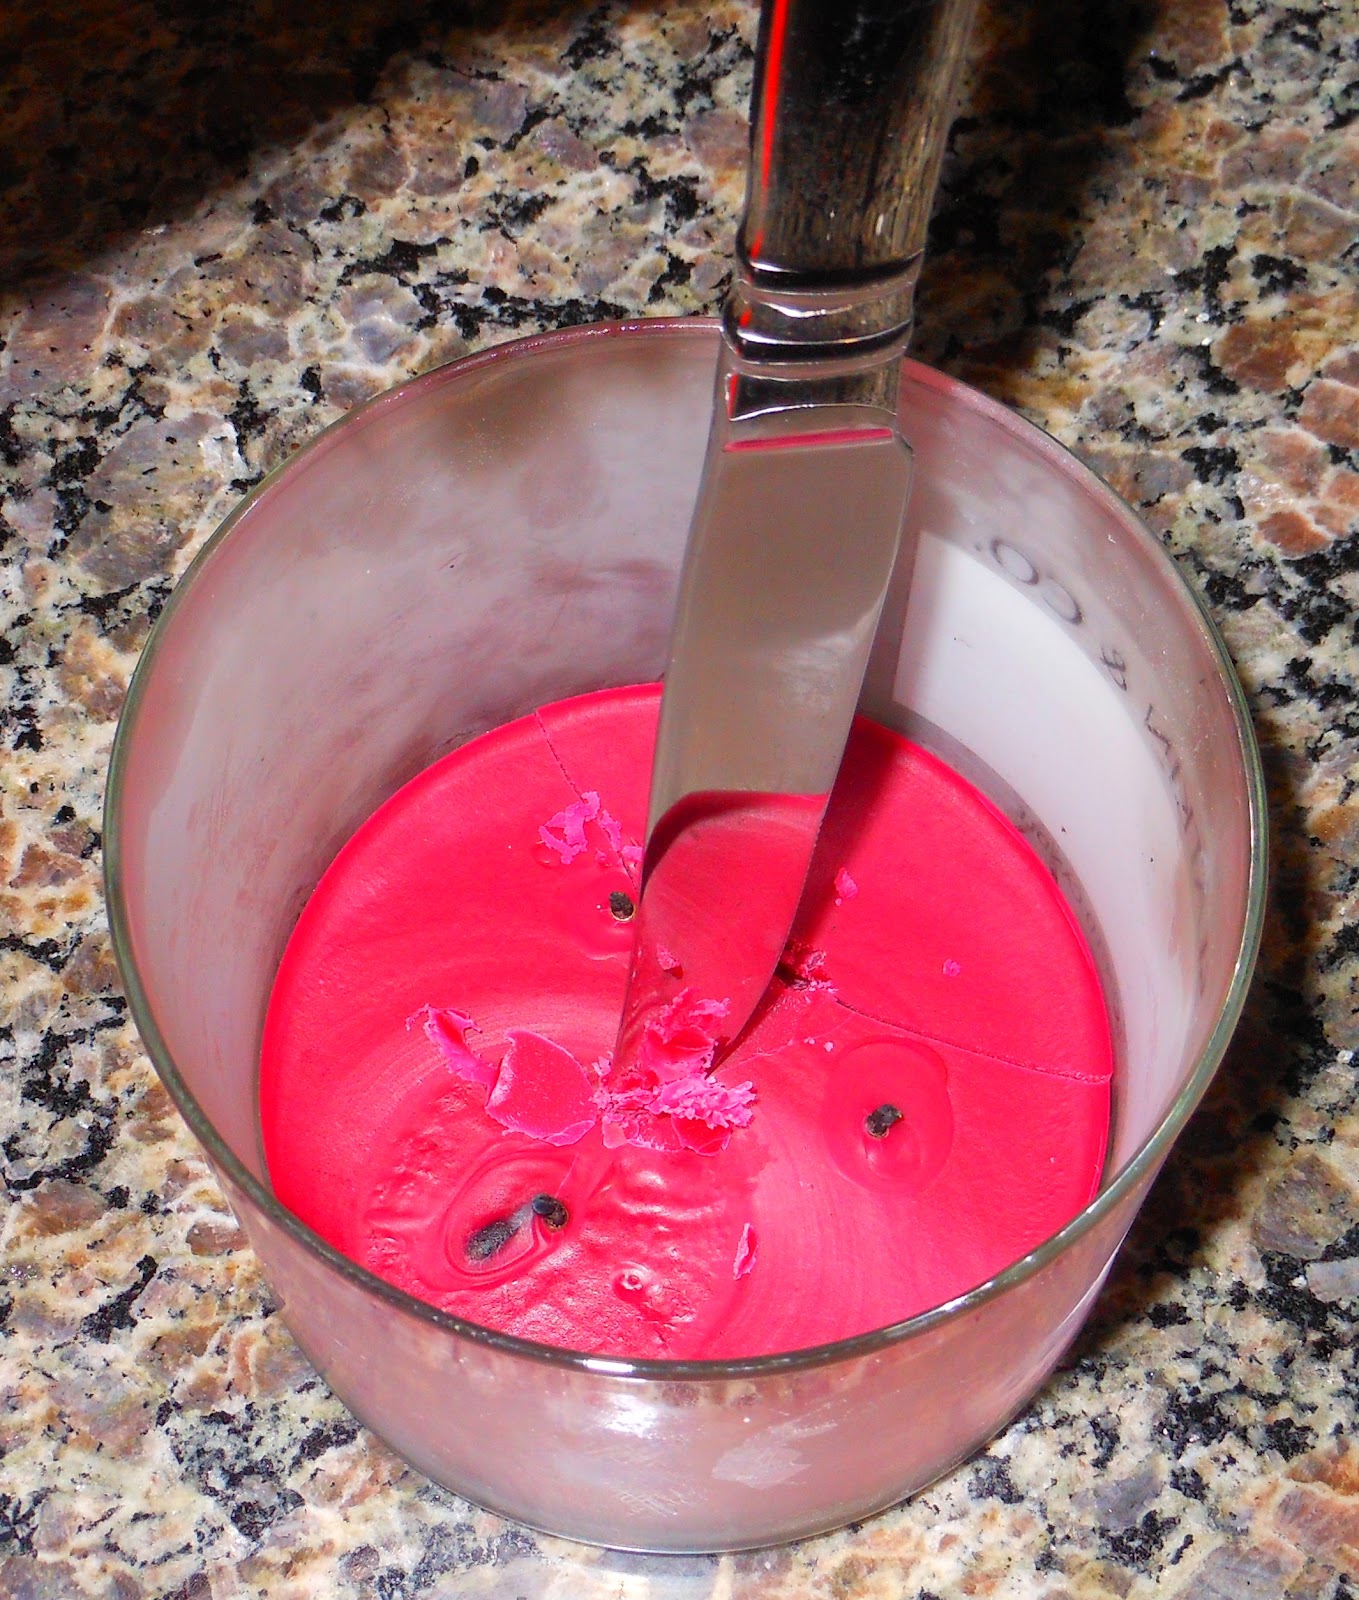
3. Once the wax starts cracking, remove each piece.


4. Keep cracking the wax until all the wax is in pieces and can be removed from the jar. 


5. If the wicks are glued to the jar of the candle, slowly use the same butter knife to lift each wick and separate the glue.  


6. Remove each wick and as much of the glue and wax residue as you can.


7. Fill a small pot with about 1-2 inches of water and heat it up until the water is about to boil. Turn off the heat and put the glass jar in the water. 


8. The heat from the water will melt the wax/glue residue and you should be able to wipe it off with a paper towel or cloth. Remove as much as you can.


9. The heat from the water will also loosen the glue from any labels on the jar, so this is a good time to remove all labels. 


10. Wash the jar with dish soap and/or put it in the dishwasher. Once the jar is clean, if there are any small amounts of glue remaining, try soaking the jar in soap and water, or use a product like Goof Off to easily remove the glue. Once the jar is completely clean, you are ready to use it for storage!


These jars are the perfect height for Q-tips, so I put a piece of cardboard in mine to act as a divider and I used half for Q-tips and half for cotton balls. You can use these for storing soaps, lipsticks, liners, makeup brushes or whatever your heart desires. Happy organizing!

Monday, September 12, 2011

My Current Makeup Storage

Hello gorgeous! How are you? I have been traveling a lot lately, which explains my lack of posting, but it has been nice to be able to travel during the warm weather! It has been raining a lot in Philly so that just means fall and winter are quickly approaching and extreme cold temperatures will be here soon. 

A few months ago I found these adorable baskets and decided to use them to organize my daily use makeup and skin care products. There are 3 sizes:

- Large: holds large makeup items
- Medium: holds skincare
- Small: holds small makeup items and sits inside the large basket


 Here is the large basket next to my iPhone so you get an idea of the size:


Since the large basket is quite deep and I didn't want my products sinking to the bottom, I inserted a couple sheets of crumpled up packing paper at the bottom:


Here are the contents of the large basket:


- Holder with makeup brushes
- Holder with pencil liners, mascara, lip products, basically anything long and thin
- Skin primer
- Foundation
- Sunscreen
- Eye Primer
- Fix+


I also have one MAC palette with my most used shadows and depotted blushes. I do switch these products around every so often depending on my mood so these products are always rotating.

In the small basket that fits in the large one I store powder, concealer, shadow pots, my pencil sharpener and other little bits and bobs that I don't want getting lost in a big basket.


The medium size basket holds my skin care products that I am currently using. Again, these get switched around every so often.


This system has really streamlined my dressing process in the morning because I can easily reach for the products I use everyday. I don't have to dig through drawers or pull out bags or boxes...everything is easily accessible and it makes my life so much easier! These baskets also make my dresser look very clean and organized. 


How do you organize your makeup?

Saturday, August 27, 2011

Slim Hangers - Get Them!

Have you invested in the new slim, space saving hangers? Ok, they are not that new, they have been out for a couple years now, but they are FABULOUS!!! I recently picked up another box from Costco ($16 for a set of 50...the cheapest I have found so far) so I thought I should see if they have changed anyone else's life closet, like they have changed mine.


Whether you have a small closet, too many clothes, like your clothes to hang neatly, or all of the above (like me), these hangers are magical! My issue with basic plastic hangers are:

1.  The shoulders of my clothes keep slipping off the hanger because of the slippery plastic
2. They stretch out the shoulders of my husband's shirts because the hangers are not the same width as a man's shirt. 
3. Everytime I need more I grab whatever is cheap and I now have 10 different shades of white hangers


I started using hangers that have a rubber on the edge so that my clothes don't fall of the hanger and my husband's shirts don't stretch, but those hangers are soooo wide! In the photo above you can see the hangers with rubber on the left, basic plastic hangers on in the middle, and the new slim hangers on the right. Although the plastic hangers are the same width as the slim hangers, the slim hangers are covered in a velvet-like material so there is no slipping and deformation of clothes. Also, the slim hangers look the same no matter where you buy them from. Problems solved!!


These slim hangers have really saved my closet because when you add up the hangers with rubber on the edge, they start to take up a lot of space. In the photo above, a set of 5 hangers with rubber is approximately twice the width of 5 slim hangers. 

Have you tried slim hangers? 

LinkWithin

Related Posts with Thumbnails