Showing posts with label makeup tricks. Show all posts

Monday, May 16, 2011

Makeup Tip Monday: How to Depot Shadows and Blushes

Ladies, this is a big one. Despite the other depotting tutorials already out there in cyberland, in the past some readers have requested to know my method, so why not tell all of you!?!

(Warning, this post is photo-heavy.)

So here is a basic MAC eyeshadow in the normal pot:


I open the lid and shove thin tweezers between the little crack that holds the black plastic holding the pan of the shadow and the base of the pot. This will allow the black plastic pan to pop out:


Here is what it should look like with the black plastic pan holding the shadow popped out:


I then light a candle. Holding the black plastic with tweezers, I put the shadow over the flame to start melting a tiny hole in the black plastic. Be careful with this since you don't want to burn everything and end up ruining the shadow or burning yourself. I also recommend doing this by an open window because the plastic burning smell can be quite yucky.


Here you can see that the center of the black plastic has started to melt. The plastic has not melted all the way through, but it is quite soft.


I immediately take a semi-sharp object like a ball-point pen and press it on the melted spot to help push the metal eyeshadow pan out of the plastic. I try not to melt too much of the plastic, so if the shadow pan doesn't pop out right away, I try melting more plastic until I can pop the shadow pan out. Also, I usually lay a soft towel down while doing this so that when shadow pan comes out, it will hit a soft surface and not break.


The metal pan holding the shadow should start to come out of the plastic. At this point I lift the metal pan out of the plastic with my fingers. 


Here is the shadow pan popped out of the plastic. The shadow is face down. Note the sticky glue on the bottom of the metal pan.


While the glue is still sticky, I like to remove the shadow label paper from the bottom of the shadow container so I can attach it to a magnet and attach the magnet to the sticky glue on the metal pan. In order to loosen the paper label, I hold the shadow container a couple inches above the candle flame for a few seconds. The heat will loosen the glue that holds the label on to the plastic container.


Once the label is a little warm, it should peel right off.


I then stick the label on a magnet.


I usually trim the magnet label in to a square that is smaller than the metal shadow pan. I have found that when I use a magnet the whole size of the metal pan the magnet is large and has so much magnetic power that it becomes hard to remove from a pallete.


Here is the final shadow pan. Pretty close to the shadow pans you can just buy from MAC, right?


Finally, I pop the little plastic piece that held the metal shadow pan back into the shadow container. Why? So I can Back-to-MAC it of course!


There it is! Hopefully you find this helpful!

Monday, May 2, 2011

Makeup Tip Monday: Dealing With Watery Eyes

Do your eyes ever start to water when lining your waterline or applying mascara? Here's a quick and easy way to clean up those tears before they start to run down your face and ruin the rest of your makeup:

Use a Q-tip (ear bud) and press the tip gently on your tear duct. The cotton on the Q-tip will absorb the tears and you won't get any makeup streaks on your face, unlike Lauren Conrad from The Hills. 


Are you ladies enjoying these Makeup Tip Mondays? Should I keep doing them?

Monday, March 28, 2011

Makeup Tip Monday! Practice Makes Perfect!

Hey gals and guys! So continuing my Makeup Tip Monday feature, here's another tip to help achieve makeup perfection:


Trying to perfect the winged liner look? Wondering how to wear that trendy bright blush? Well, practice the look in the evening right before you wash your face at night. If it turns out great, you're on your way to mastering the technique! If not, you are going to wash your face anyways so no one will see it!


Hope you got some rest over the weekend and your Monday is off to a great start!

Friday, August 27, 2010

Another Quickie Eyeliner Tip

I already had this post planned for today, but one of my wonderful readers already gave the tip away in her comment to my previous post. But here it is anyways...

When lining your eyes, dot or dash the liner along your lashline to create the shape and thickness of the line. Then connect the dots/dashes to create an even, smooth line.

When using a gel or cream eyeliner, you can lightly pat or dash the brush along the lashline and then connect the dots. When using a pencil, you can create dots or dashes and then connect them. This technique allows you to ensure a smooth line that doesn't get too thick or thin on one eye, because you create the shape and thickness first, then draw the line.

Oh!! For those of you on Facebook, I created a Kajal Couture Facebook page and would love to have you follow me there and stay up to date on my latest makeup encounters! Just click here and at the top of the page, click on the "like" button next to my name Kajal Couture. Thanks for your support!

Wednesday, August 25, 2010

Eyeliner Week Continues - New Way to Use Pencil Eyeliner

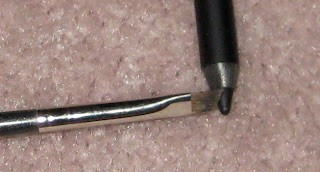
Lately, I have been using a new technique to apply pencil eyeliner:

I take a small, angled brush that I would normally use for a cream or gel liner, 


 I swipe the bristles against the pencil to pick up the color,


Tuesday, August 24, 2010

Eyeliner Quickie Tip #1 - Practice Makes Perfect

We've all heard our parents, teachers, mentors....anyone who tried teaching us when we were younger....and the one thing they always said was "practice makes perfect." 

This same philosophy holds true for makeup application! 

A friend of mine long ago shared a great tip with me and I hope you all find it useful as well:

Practice eyeliner at night, right before washing your face.

Whether you are new to eyeliner, trying to get the hang of gel or cream liners, wanting to get the extended eyeliner flick just right, or just experimenting with a new look, I think this is a great tip! If you mess up, you are going to wash it all of anyways. Once you starting getting it right, then you are ready to do the look and your practice has lead to perfection!

Monday, July 12, 2010

Deepika Padukone Makeup Breakdown

One of my family friends in India is pretty well connected and was telling me how Bollywood actress Deepika Padukone is a desi (Indian) girl next door. She eats real food and actually gets hungry, she doesn't spend every last waking second at the gym, and she is pretty down-to-earth. And another thing, she has natural beauty. A lot of actresses rely on the magic that is makeup in order to keep up their image. Deepika looks great even bare-faced.

That inspired me to read a bit more about Deepika Padukone and in doing so, I came across some photos of her from the Cannes Film Festival this year.


She definitely has a hot body, but I think her hair and makeup are absolutely gorgeous:


Her makeup is simple yet elegant, and is appropriate for everyday and a fancy event. Here is how to create the makeup:

Monday, July 5, 2010

IMATS 2010 - Part 2: Workshops with Makeup Masters

I attended several of the classes/seminars/workshops at IMATS and let me tell ya...a lot of the hot shot makeup artists are HILARIOUS!


I went to Eve Pearl's session, where she discussed kit essentials, talked about her product line, and did several demos. This gal has got so much personality and talent that it's no wonder she is a 5-time Emmy-award winner, has madeover tons of celebs, has done work all sorts of media productions, has her own makeup line, has her own studio in NYC, and still exudes that warmth that makes you want to be BFFs with her.

Sunday, October 25, 2009

Fab Reads at Total Beauty and My Halloween

Ever have those days where you can just spend hours upon hours reading about hair and makeup? I'm in one of those zones right now, and thought I would share with you a few articles from Total Beauty that I found interesting and useful:

17 Hairstyles That Take Less Than 10 Minutes

Top 11 Ways to Get Gorgeous in Minutes

10 Best Budget Beauty Tips

14 Secrets Your Hairstylist Won't Tell You

What are you lovelies doing for Halloween? My friends have decided that we are all going as characters from Gilligan's Island. Now I know some of you probably never watched that show growing up, but for me, it was one of those staple shows that was always on after school. I used to come home, eat a snack, and watch me some Gilligan's Island and Saved by the Bell. Ahhhh, the good ol' days....

Anyhoo, I am not big on Halloween. Yes I enjoy dressing up and doing fun makeup, but people always have high hopes for how fun it is going to be, and it never ends up being that great. There are too many expectations associated with it, and I prefer to just go out and have fun, without all the expectations. I would much rather stay home and pass out candy, while ooooh-and-aaahing at all the little kids in cute costumes. Anyhoo, I have been assigned the character Ginger, which should be up my alley since she is the glamorous one, but now I am stumped on the costume. I refuse to spend loads of money on a costume that I will wear for a few hours on a not-very-fun night, so I am on the hunt for a cheap white/gold dress and a red wig. Any ideas ladies? I was thinking if I can find a creme colored maxi dress then I can just add some bling and make it more Ginger-esque. What do you think?

Wednesday, August 26, 2009

Loose powders making a mess? Here's what I do

Do you own any makeup that is a loose powder? Ever notice how it always makes a mess and you end up spilling a good amount every time you use it? I am so clumsy with loose powders it practically turns me off of buying more...but alas some products are just so amazing that I have to deal with the mess. Until now.

What I discovered not too long ago is a little trick to minimize the spillage factor. I will take my loose powder product and try to get the powder to go back down the filter through the little holes. I will use some kind of clean, sanitized spatula so I don't get bacteria in the product. Here I used one of those little spoons you get when you go out for gelato. (Yes, I save and clean these guys and keep them handy for makeup, putting in little spice jars, etc.) I take the spoon and move the powder back and forth allowing it to fall through the filter holes like so:
Once most of the powder is down through the holes (or when I have lost my patience doing so), then I will move the remaining powder on the filter to one side. Then I take a piece of clear tape and cover most of the holes. In this photo I have covered about half of the holes:
I will keep doing this until only 3 or 4 holes are exposed. I find that is enough to give me the right amount of product for one application.

With this powder I had already opened and used it months ago so I had a lot of product I had to push through the holes. Therefore, I recommend taping holes as soon as you purchase and open a new loose powder. Most loose powders should have a sticker on the filter that you have to peel off. As soon as you peel that off, use some tape and tape up the holes. That way, you can avoid the first step I showed you here and you will thank yourself for saving that time. Ta-da! Easy as that and now you will not have a powdery mess when you open up a loose powder jar!

Oh, in case you are wondering what product I was using in the photos, that is a MAC loose beauty powder in drizzlegold. It is a sheer shimmery powder that can be used anywhere, but is absolutely divine as a highlighter on all skintones. I will use the 224 to pick some up and dust it lightly above the cheekbones and on the temples. This also gives a great shimmer to the shoulders and other areas of the body. It gives a subtle sheen to the skin and picks up the light beautifully. Loose beauty powders are a PRO product so if you are interested in getting one, check out or call a MAC PRO store.

LinkWithin

Related Posts with Thumbnails